If you’ve ever stood over a pot, stare at a leaf, and thought, “That’s odd,” only to flip the page and find a new issue you didn’t expect—welcome to the club. Leaf spots are a gardener’s most common mystery. They show up fast, change shape with the weather, and, frankly, fool a lot of us into thinking we’re dealing with a single enemy.
What I want to share is a practical, no-fluff guide to spotting mixed infections and lookalikes. The kind of guide you actually use in the garden, not the one you scroll past while half thinking about a project you’ll start next weekend. This is about how to observe, document, and intervene without burning your plants or your wallet.
And yes, I’m going to ground this in real-world detail. I’ll walk you through a 14-day monitoring routine, give you a simple decision framework for sequencing treatments, and share a real case with photos (conceptual, not a gallery, but representative) to show how the pieces fit together.
But first, a quick moment I won’t forget. I had a tomato bed that looked like early blight—dark rings, the works. I treated with a copper spray, then, a week later, followed up with a systemic fungicide. New growth looked better, but two weeks later, I found a slimy, water-soaked lesion creeping along the leaf edge. It wasn’t a single disease anymore. The lesson? Beauty in diagnosis lies in keeping the door to secondary invaders open only as long as your actions leave it closed behind you.
A micro-moment that still sits with me: I learned to pause and re-check weather notes before the next spray. The tomatoes were happiest on dry mornings; humidity in the late afternoon turned a small wound into a welcome mat for secondary invaders. Small detail, big consequence.
The diagnostic journey isn’t glamorous. It’s a mix of careful observation, hard numbers, and a little bit of detective work. It starts with thinking beyond the obvious and ends with a plan that respects plant physiology, environmental realities, and the chemistry you’re about to steward.
How mixed infections show up: a practical lens
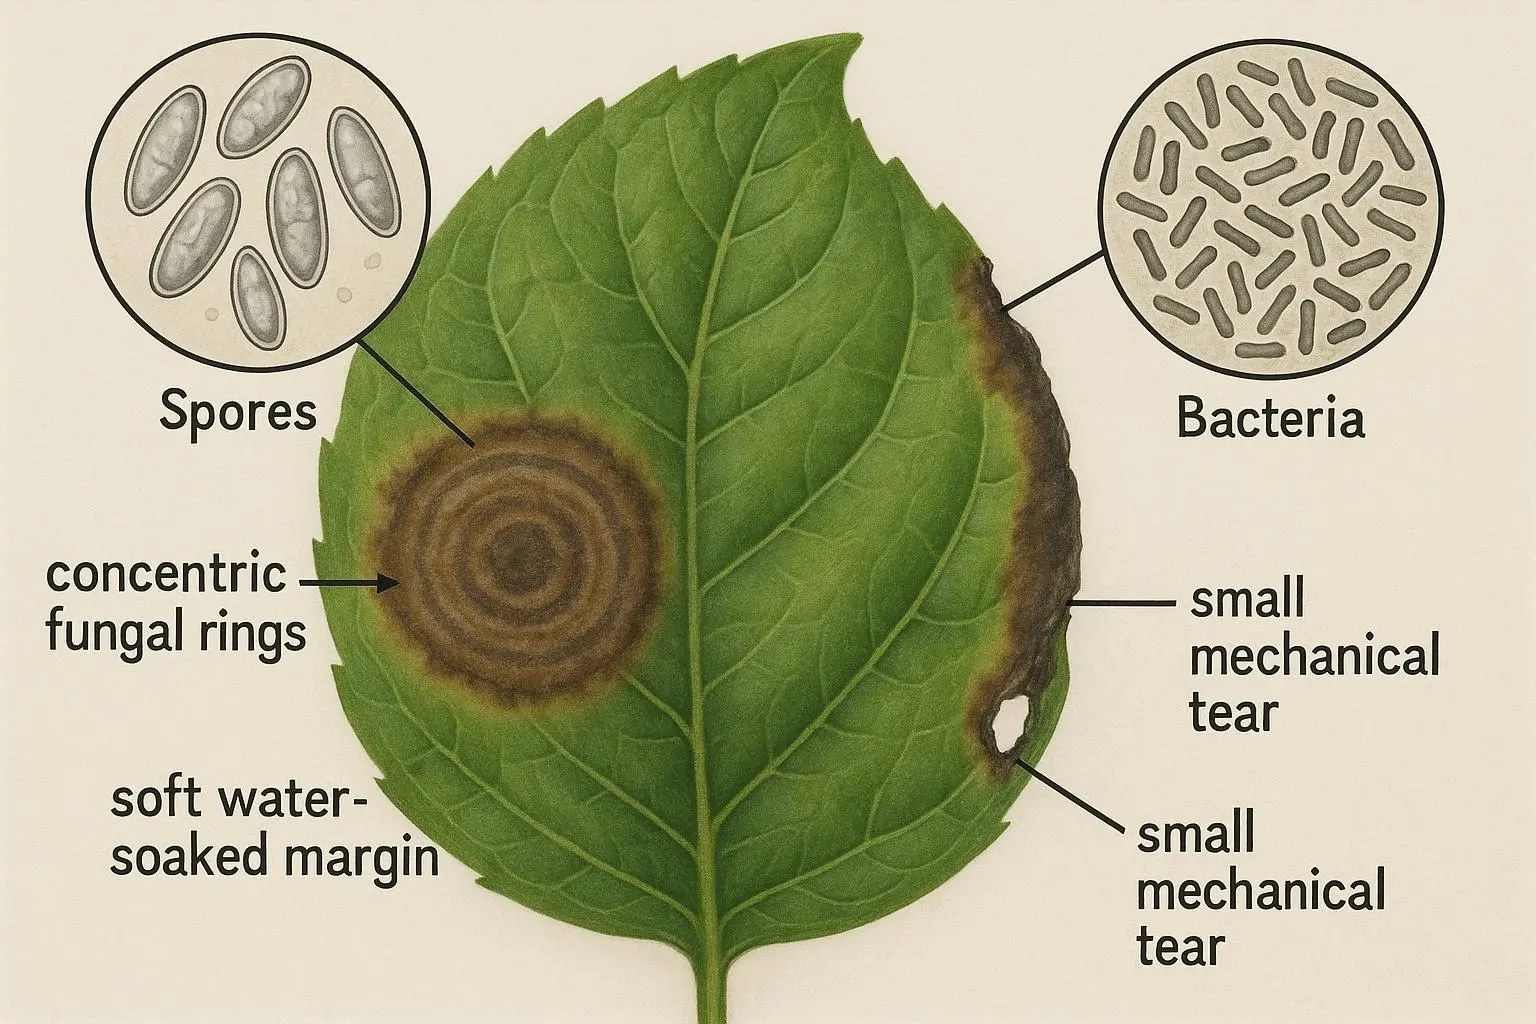
Let’s start with a simple truth: many leaf-spot presentations aren’t clean. A fungal spot can sit on a leaf and look perfectly “fungal,” until you notice a neighboring area that’s soft, water-soaked, or discolored in a way that suggests bacterial activity. Or you might see a site where a healthy green tissue has a scar that later becomes colonized by an opportunist fungus. The result is a patchwork of symptoms that doesn’t map neatly onto a single pathogen.
Here’s how I’ve learned to read those patches in the field:
- Texture and margin tell a story. Dry, defined fungal lesions with crisp margins often indicate primary fungal pathogens. Soft, mushy lesions with water-soaked halos suggest bacteria are involved, either as the primary issue or as a secondary invader exploiting damaged tissue.
- Signs you can’t ignore. Fungal fruiting bodies vs. bacterial ooze is a classic differentiator. If you can glimpses of spore structures under magnification, you’re looking at a fungal component. If you see milky ooze at the lesion margin, that’s bacterial activity. And if you notice insect activity or honeydew, you’re looking at a broader ecology that’s feeding the problem.
- Symptom progression matters. Pathogens spread in patterns that water splash or insect vectors facilitate. Abiotic stress—think chemical burn, sun scorching, or nutrient toxicity—often presents more uniformly across leaves or along margins and tends to be a different beast to fix.
In practice, mixed infections aren’t guesswork. They’re a matter of assembling clues—symptom characteristics, the plant’s environment, and how the tissue responds over time.
A real-world diagnostic framework you can reuse
If you’re serious about diagnosing mixed infections, you’ll benefit from a lightweight, repeatable protocol. It’s not glamorous, but it works:
Start with a clean baseline. Gather photos of the affected area, including a healthy leaf nearby for reference. Try to photograph the same leaf position over time so you can compare changes.
Sample methodically. When you cut into a lesion, include both the healthy margin and the interior of the spot. This helps you see the boundary where the pathogen meets healthy tissue.
Do a simple “wet mount” if you can. Place a tiny piece of tissue on a slide with a drop of distilled water, cover it, and look under magnification. If you see filamentous hyphae and spores, you’ve got fungal tissue. If you see a milky exudate streaming from the cut edge, you’ve caught bacterial presence in action. This isn’t a lab-grade test, but it’s a practical way to confirm that two types of organisms are co-existing.
Track environmental signals. Humidity, temperature, and air circulation aren’t just background noise—they actively shape whether a microbe can invade and persist.
Document progression. A simple 14-day log helps you separate a true improvement from a plateau or a rebound. Take photos, note the environment, and record what you applied, when, and how plants responded.
Interventions that acknowledge the reality of mixed infections
The core idea is simple: don’t slam two different products together unless you know they won’t fight each other or hurt the plant. The sequence matters, and so does the choice of product types.
Key principles to guide your decisions:
- Treat the most aggressive or systemic issue first. If you can identify a dominant pathogen, start there, then move to a secondary invader after a short window to let the plant recover a bit from the first hit. Sometimes you need a tool that covers both, but you must verify compatibility first.
- Make them play nicely. Some combinations are a recipe for phytotoxicity. Oils with copper, or sulfur with certain oils under heat, can scorch leaves. Always check compatibility labels before you mix products.
- Rotate by mode of action (MoA). Rotating fungicides and bactericides by MoA helps prevent resistance and reduces plant stress. FRAC’s code list is a great reference, and there are safety sheets to check for overlapping residues and compatibility.
- Use environment management as a partner, not a substitute. Pruning for air flow, adjusting watering, and improving light access can dramatically reduce the conditions that allow mixed infections to thrive.
A practical, safe rotation sequence (illustrative, not universal)
Phase 1: Aggressive primary issue (if bacterial, copper-based products can be an option; if fungal, a systemic or strong contact fungicide might be used)
- Allow residue to dry or rinse if the label requires
- Wait 5-7 days to observe plant response
Phase 2: Secondary pathogen (fungal if the first is bacterial, or vice versa)
- Apply a systemic fungicide or broad-spectrum contact fungicide, ensuring no compatibility conflicts with Phase 1 products
Phase 3: Prevention and environment
- Implement cultural controls (air flow, pruning, watering timing)
- Consider biological controls (friendly Bacillus species, beneficial microbes)
- Plan for ongoing monitoring with your 14-day checklist
A note on the psychology of plant health
This work isn’t just about killing bugs. It’s about reducing the physiological stress that weakness creates in the plant. If the plant’s environment remains conducive to disease—even if you momentarily knock back an infection—the problem will reassert itself. That’s why the environmental piece isn’t optional; it’s the core of sustainable improvement.
The 14-day resolution checklist (the practical backbone)
This is the map I use with my own plants, and I’ve found it incredibly useful for keeping things actionable rather than endless, vague observation.
- Day 1-3: Scan for continued spread. Focus on whether the edges of existing lesions are expanding. If they are, you’ll want to adjust your approach quickly.
- Day 4-5: Photograph with a ruler in the frame for scale. Consistency matters—use the same lighting and angle so you can compare later images meaningfully.
- Day 7: Check new growth. If new leaves emerge cleanly with no spots, that’s a solid signal you’re on track.
- Day 9-10: Review environmental conditions. Humidity spikes or cooler nights can undo progress quickly; adjust watering schedules or air circulation if needed.
- Day 12-13: Reassess treatments. If progress stalls, consider whether you’re dealing with a missed primary pathogen, a resistant strain, or environmental factors that weren’t addressed.
- Day 14: Take a full plant inventory. Compare current appearance with Day 1 photos. If the plant looks healthier and new growth is vigorous, you’ve likely achieved resolution. If not, you’ll want to re-evaluate your diagnosis and possibly return to a more targeted management plan.
What about “lookalikes”? Common traps and how to avoid them
Lookalikes are the reason mixed infections carry on longer than they should. It’s easy to misattribute symptoms to one cause when the landscape of the plant’s health is more complex than it first appears.
- Abiotic damage vs biotic damage. Nutrient deficiency, mineral burn, or sun scorch can mimic disease at first glance. Check distribution patterns: abiotic issues tend to be symmetrical or follow a consistent pattern across many leaves; diseases are more random and often linked to moisture events.
- Mechanical damage masked by fungi. A scratch or wind damage on a leaf can attract opportunistic fungi, making the wound appear like a pure fungal problem. Look for damaged tissue that predates the disease, and confirm whether the fungus is present in the lesion margins rather than all over the leaf.
- Viral lookalikes. Viruses can create mosaic patterns or chlorosis that resemble some bacterial or fungal symptoms. Viral symptoms tend to be systemic or show up in a mosaic or blotchy pattern. If you’re unsure, a culture-based approach or a quick lab test might be necessary.
Real-case photos and narrative (conceptual)
Case A: Mixed infection in a tomato plant. A defined fungal spot with concentric rings sits next to a soft, water-soaked lesion that expands as humidity rises. The sequence was copper-based bactericide first, then a rotating systemic fungicide after a brief dry-down period. New growth after the second treatment was clean, suggesting the plan worked, but only when the environmental factors (water management and air flow) were addressed in parallel.
Case B: Citrus tree with lookalikes. A young orange tree shows smaller, discrete fungal rings on some leaves and a few leaves with diffuse chlorosis near tips. A careful sampling and a wet mount revealed fungal hyphae in some spots and bacterial ooze in others, confirming a mixed infection scenario. The response combined careful cultural controls with a phased chemical approach to avoid phytotoxicity and preserve beneficial microbes.
Case C: A rose bed with a recurring problem. A gardener noted recurring yellowing and leaf drop despite repeated fungicide applications. The problem turned out to be environmental—high humidity and poor air exchange—creating a perfect storm for opportunistic secondary invaders. The fix was a heavy emphasis on pruning to improve airflow, paired with a watchful eye on moisture levels and careful timing of any chemical interventions.
Real-world testing and evidence you can lean on
Grounding decisions in credible sources matters. For this topic, you’ll want to anchor your practice in:
- Diagnostic guidelines that help distinguish fungal vs bacterial diseases and note how co-infections shift symptom expression
- FRAC’s Code List for rotating modes of action to avoid resistance and minimize phytotoxicity
- Extensions and university resources that emphasize environmental control as a core component of disease management
This isn’t about chasing a single silver bullet. It’s about building a toolbox you actually use.
A note on the technology and tools that help
- Photo documentation. A simple garden journal app or even a folder on your phone with dated photos helps you compare symptoms over time and against a baseline.
- Wet mount capability. A basic magnifier or a low-cost digital microscope can reveal fungal structures or bacterial ooze that won’t be visible to the naked eye.
- FRAC guidance and SDS warnings. Knowing your chemistry’s MoA and the potential phytotoxic interactions is essential before you mix anything.
To help you stay organized, consider these tools:
- PictureThis or Plantix for quick AI-assisted screen-and-suggest, then validate with manual checks
- Garden Journal & Planner for structured observation and a built-in 14-day checklist
- FRAC Code Search Tool for rotation planning
- MSDS Online for safety disclosures and compatibility reminders
What I’d do if I were starting from scratch
If your garden is a mess of mixed signals, here’s what I’d do in the first two weeks:
- Day 1: Photograph everything. Record plant type, stage, and environment. Note any recent weather patterns or changes in watering.
- Day 2-3: Clean up the most affected leaves to reduce inoculum. Keep your cleanup tools clean; don’t spread disease.
- Day 4-5: Sample a few lesions for a quick “wet mount” check if you can.
- Day 6-7: Apply a first intervention with clear, label-appropriate timing windows. Mark your calendar for Day 13 or 14.
- Day 8-12: Improve air flow and reduce leaf wetness. If you must water, do it in the morning, not late in the day.
- Day 14: Reassess with photos and notes. Decide whether you’re seeing true progress or if you need to pivot.
A final reminder about patience and precision
Like any good gardener, you want results fast. And I get that. But the fastest route to lasting health is often the slow, deliberate path: accurate diagnosis, careful sequencing, and a disciplined approach to monitoring. If you skip the environmental fixes or rush a spray without reading the label, you’ll be back to square one with a different set of symptoms.
In my garden, this approach has paid off many times. I’ve watched beds recover when I stopped chasing “the problem” and started chasing the ecology—the air, the moisture, the plant’s stressors. The plants teach you quickly: the moment you back off and simplify, healing begins.
References
University of Minnesota Extension. Diagnosing Plant Problems: Fungal vs. Bacterial Diseases. Retrieved from https://extension.umn.edu/plant-diseases/diagnosing-plant-problems
UMN Extension. Diagnosing Plant Problems: Fungal vs. Bacterial Diseases. Retrieved from https://extension.umn.edu/plant-diseases/diagnosing-plant-problems