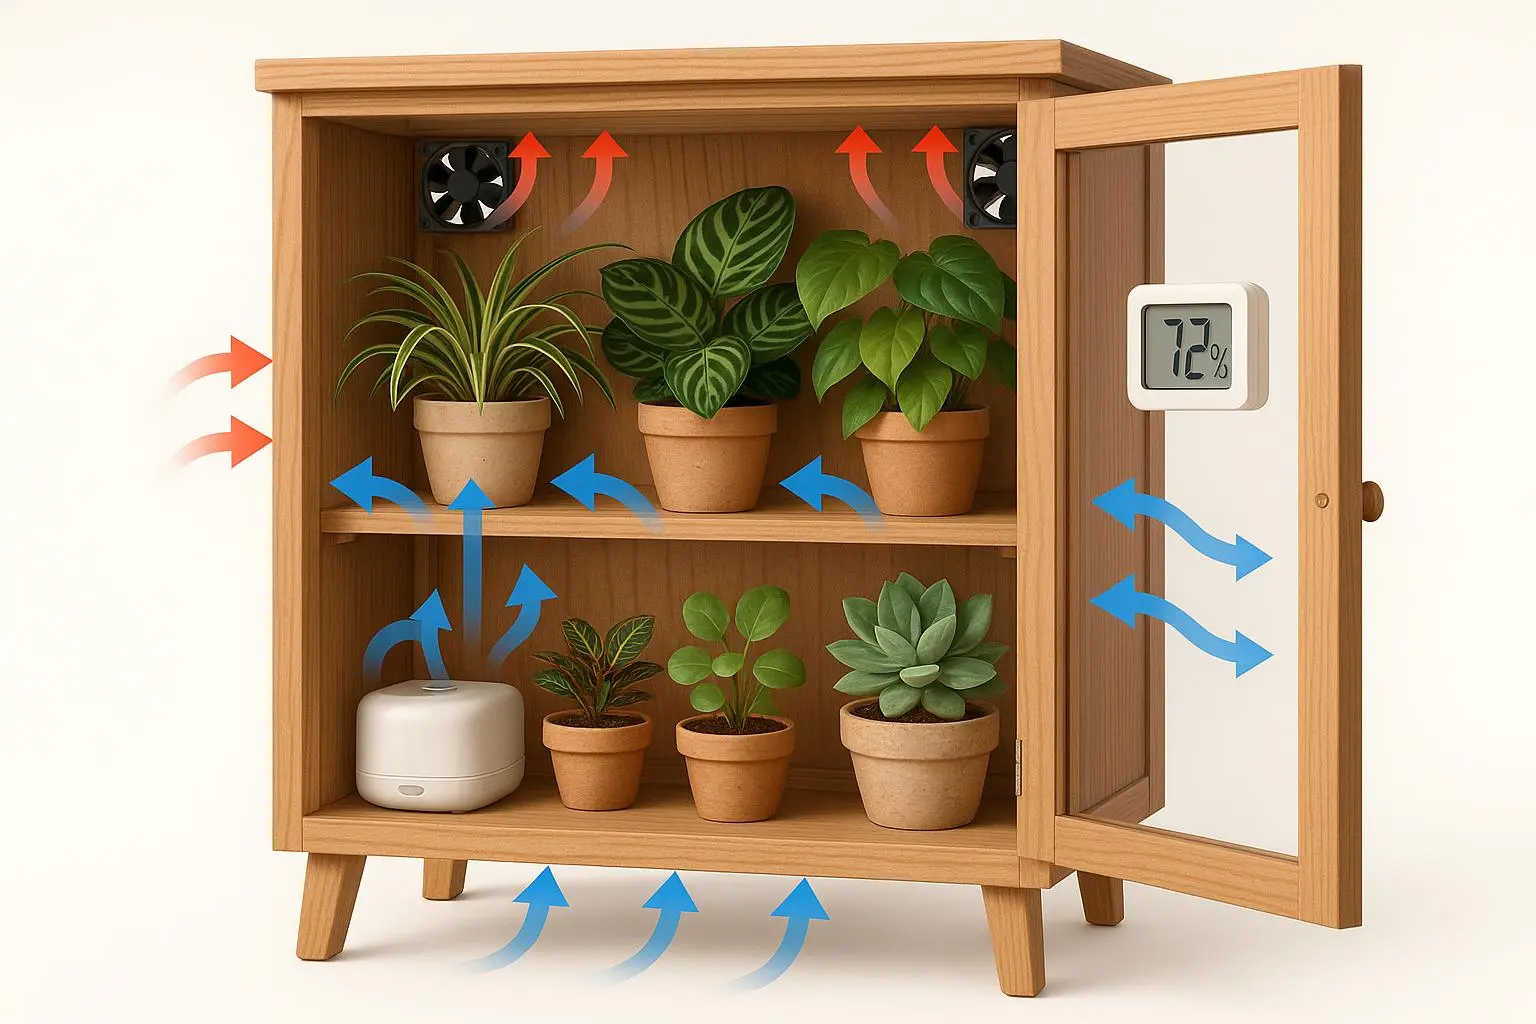
If you’re a collector or a hobbyist, you’ve probably chased the dream of a perfect tropical microclimate without turning your living room into a greenhouse. You want humidity up where you need it, airflow where you don’t, and none of the drama—mold, pests, water damage, and a tangle of cords that would make a fire marshal wince.
I’ve built a few small grow cabinets and a couple of shelf setups that actually work. Not “theoretically works” but works in the real world—with a firebellied, practical rhythm you can replicate without becoming a full-time electrician or HVAC tech. Here’s how I think about balance: humidity and airflow aren’t enemies. They’re dance partners. If you give them equal stage time, the show stays on script.
A quick scene from my own experiments might help you see what I mean. I started with a single, sealed shelf and a tiny humidifier tucked inside. The first week looked like a postcard: glossy leaves, shiny glass, humidity high enough to fog the door. Then the problems showed up. Condensation pooled on the glass, sticky residue lined the shelves, and a faint mold whisper started around the corners. Not dramatic, just annoying. I learned three things fast: you need air movement, you need the humidifier outside the enclosure if possible, and you need a plan that scales as you add shelves.
And here’s a micro-moment that still sticks with me: I replaced a quiet, passive approach with a loud, practical one. I mounted a small 40mm fan at the bottom and another at the top, both running continuously, and I piped the humidifier’s output through a small hose into the cabinet rather than letting fog accumulate inside. The room no longer smelled like damp cardboard, and the plant leaves stopped “sweating” with every door opening. The difference wasn’t a fancy gadget; it was a simple, repeatable workflow.
This post is a practical walkthrough, not a fantasy. You’ll get two sample layouts (one single-shelf, one multi-tier), a clear supply list, and an expected RH curve you can actually rely on. I’ll also share real-world mistakes others (including me) have made, and how to avoid them.
The microclimate triangle: RH, airflow, and VPD
When you’re working with small enclosures, you’re not just controlling humidity. You’re shaping Vapor Pressure Deficit (VPD)—the difference between the air’s capacity to hold moisture and the moisture it actually contains. VPD is a better predictor of how plants transpire than RH alone. High humidity without airflow creates a stagnant boundary layer around leaves, which stifles transpiration and nutrient uptake and gives mold a comfy seat. Low humidity + strong airflow can desiccate leaves quicker than you want.
I learned this the hard way during a winter experiment. I kept RH at 75% in a closed Detolf cabinet and assumed I was golden. Growth was okay, but the leaves curled a bit, and I started seeing little brown tip burn on tropicals. When I finally introduced continuous, gentle airflow from both ends and tuned RH to a modest 70% with occasional bumps to 75% during the heavy fogging windows, the foliage opened up. The plants looked happier, and the risk of stagnant moisture dropped dramatically.
A practical takeaway: airflow is not just an afterthought. It’s a core component of plant health in compact spaces.
Passive vs. active humidity control: what actually works
Passive systems are quiet, simple, and cheap. They rely on evaporation from water trays, wet substrates, or the enclosure’s natural sealing. They’re best for plants that tolerate mid-range humidity (roughly 60-70%). But tropical plants that crave the 75-85% range often fight an uphill battle with passive setups alone.
Active systems are where the real stability comes from. Ultrasonic humidifiers are common, but inside a sealed cabinet, they’re easy to misuse. The safer route is to place the humidifier outside the cabinet and run a fog hose in. It limits electrical exposure inside the cabinet and makes refilling and cleaning easier. If you do run a unit inside, keep it compact, and ensure it’s easy to drain and dry to avoid mineral buildup and microbial growth.
From field notes and user stories, one line sticks out: “humidifier outside, fog piped in” saves you from a cascade of headaches. It’s not a sexy setup, but it’s reliable.
And the right humidity control is not a single dial or a single device. A hygrostatically controlled system (a hygrostat) provides target RH, but you’ll want to couple that with smart scheduling so the fans and humidifier cooperate rather than fight over bandwidth.
Airflow design: practical rules you can apply this weekend
- Run fans continuously. Yes, 24/7. Place them to create a gentle stream that disrupts the boundary layer around leaves. The goal is not a breeze; it’s consistent air movement that prevents pockets of high humidity where pests tend to gather.
- Use two fans at different heights and opposite ends if possible. For a single-shelf setup, one low and one high can move air across the shelf evenly. For multi-tier cabinets, you’ll want top-exhaust and bottom-intake or two cross-ventilating fans staggered across the height, so air travels vertically.
- Tie fan operation to humidity readings when you can. A smart plug or a simple controller that keeps the fan running and starts the humidifier when RH drops helps maintain a stable environment without babysitting.
- Cable management matters. Raw cords and water spray are a bad combo. Use grommets, cord locks, and keep water containers away from power strips. If you can, put the main power strip outside the enclosure so any moisture doesn’t threaten the electrical heart of the setup.
A quick note on safety: if you’re in a space with multiple enclosures, protect electronics with proper enclosure ratings, and use GFCI outlets for everything that sits near humidity. The risk isn’t dramatic, but it is real.
Sample Layouts and supply lists
Here are two concrete layouts you can actually build this weekend. Each table lists the core components, purpose, and the expected humidity profile. I’ve left room for personalization—your plant collection will guide some choices.
Layout 1: The Single-Shelf Setup (The Minimalist)
Best for a small bookshelf or a single IKEA Milsbo shelf. Minimal footprint, easier to seal, and quick to tinker with.
| Component | Specification | Purpose |
|---|---|---|
| Enclosure | Sealed single shelf (acrylic box or glass door) | Contain humidity and visibility |
| Airflow | 1 x 40mm USB fan (low noise) | Internal circulation, breaks boundary layer |
| Humidity | Passive bottom layer (Leca/Moss) OR small external fogger via hose | Target RH: 65-75% (adjust with room conditions) |
| Lighting | 10W LED strip | Plant growth and visibility |
| Seal/Weatherstripping | Weatherstripping around edges | Minimize leaks and air gaps |
| Control | 1 x Hygrostat + smart timer plug | Setpoint-based humidity with continuous airflow |
| Cable management | Cable raceways or a small box | Keep cords dry and neat |
What to expect: A stable RH curve that hovers around the 65-75% range with small oscillations tied to ambient room temperature. The continuous fan keeps air moving and reduces condensation on the glass door.
Layout 2: The Multi-Tier Cabinet (The Tropical Haven)
For taller cabinets (Detolf, Rudsta, or a tall bookcase with sealed doors). More space means more vertical humidity gradients to manage. This plan addresses that by pairing vertical air movement with a slightly higher RH setpoint and stronger airflow.
| Component | Specification | Purpose |
|---|---|---|
| Enclosure | Tall, multi-shelf cabinet sealed with weather stripping | Maximize vertical space while containing humidity |
| Airflow | 2 x 80mm PC fans (top exhaust, bottom intake) | Vertical air exchange, reduces stratification |
| Humidity | External ultrasonic humidifier + fog hose | RH target: 70-85% (tiered adjustments possible) |
| Lighting | Adjustable LED per tier | Space-efficient growth lighting |
| Control | Hygrostat + smart timer or dedicated humidity controller | Automated control with predictable RH |
| Safety | GFCI outlet, waterproof connectors | Electrical safety in moist environments |
| Cable management | Channelled wiring and grommets | Dry, organized interior |
Expected RH curve: A fairly steady 70-85% across shelves, with the upper levels slightly drier if the top exhaust is strong, unless you push the humidifier to feed more fog in the lower zones.
What you’ll learn here: vertical airflow matters. Without it, the top shelves can dry out, the bottom can stay damp, and you’ll fight a microclimate all day long.
Sanitation notes you should adopt for both layouts:
- Water quality matters. Use distilled or RO water for ultrasonic humidifiers to avoid mineral build-up that leaves white dust on leaves and equipment.
- Clean the interior regularly. Wipe glass and shelves with a hydrogen peroxide solution (3%) or a mild bleach solution (1:10) every 4-6 weeks.
- Keep moisture away from electronics. If you can, mount the main power strip outside the enclosure and seal power connectors to reduce electrical hazards.
- Pest prevention is not optional. Regular cleaning and moisture management are your best pest control—fungus gnats and mold don’t need dramatic triggers to show up.
I’ve seen people underestimate the maintenance piece. The plants look great for a while, then a small gnats outbreak can derail an otherwise solid setup. The cure is a bit of routine: weekly glass cleaning, a quick wipe of the shelves, and keeping stagnant water out of the enclosure.
Two practical, real-world stories from the field
The “two-fan revolution” moment A fellow collector on Reddit was drowning in humidity and condensation. They swapped a single, quiet fan for two little PC fans—one at the bottom, one at the top—wired to a single smart plug. The humidifier ran on a simple timer. The result? Growth shot up in two weeks, leaves unfurled, and no more foggy glass. The learning: constant, gentle airflow matters more than a fancy humidifier in a small cabinet.
The humidifier-in-the-middle disaster Another hobbyist learned the hard way that putting a humidifier inside a sealed cabinet is a trap. Condensation pooled on the power strip, and white mold started forming on the potting mix. Now the humidifier sits outside, fog runs through a hose, and a hygrosat handles the rest. They’ve never looked back. The takeaway: keep moisture away from electrical components whenever possible.
A quick aside that stuck with me after hearing these stories: the small details matter. A 1/4 inch of clearance around the humidifier and a tidy hose route can save you hours of cleanup later. It’s the little things that keep a project from becoming a maintenance marathon.
Sanitation and pest prevention: practical hygiene habits
- Water quality first. Ultrasonic humidifiers love clean water; mineral residues create visible dust and can trap moisture in the substrate, inviting pests.
- Wipe and review. A routine wipe-down of all interior surfaces, at least every 4-6 weeks, reduces mold spores and bacterial buildup.
- Proactive pest measures. If you’re seeing gnats or fungus gnats, integrate a mild insecticidal approach (like mosquito bits in the potting mix) and maintain dry soil surfaces where possible.
- Don’t ignore humidity spikes. If the RH climbs rapidly, run the fans longer and re-check the seal around doors. A tight enclosure makes a big difference.
See? It’s not glamorous, but it’s effective. The best setups I’ve seen are the ones that combine a durable plan with a little daily maintenance.
Final considerations: electrical safety and scale
- Never ignore electrical safety in humid environments. Use GFCI outlets and sealed or weatherproof connections where possible.
- Keep cables managed. A clean, organized interior is safer and easier to troubleshoot.
- Start small, scale slow. If you’re new to this, begin with Layout 1 and iterate. When you’re comfortable, move to Layout 2 and fine-tune the airflow across the shelves.
If you want a quick checklist:
- Seal edges with weatherstripping or shower seals.
- Place at least two fans (one low, one high) for continuous air movement.
- Route humidifier output through a hose into the cabinet if possible.
- Use a hygrostat or humidity controller with a reliable setpoint.
- Keep power strips outside the enclosure or in a waterproof enclosure.
- Clean monthly and monitor for condensation, mold, or pests.
And if you want to go deeper, you can experiment with VPD targets. A practical starting point for tropical collectors is to aim for a VPD around the 0.8-1.2 kPa range at typical room temperatures (around 24-26C). You’ll need to adjust for leaf temperature and how aggressively you feed humidity. A VPD calculator can be your friend when you’re ready to optimize the environment for specific plant types.
References
Reddit user "AroidAddict" (2024). Airflow benefits and growth rate.
GreenThumbGuru, Reddit (2023). Two 80mm PC fans with smart plug control.
MossyManiac, Rare Plant Exchange (2024). Maintenance and pest control in humid setups.